HTML Tutorial

This is a set of HTML tutorial. If you want to know web designing or blogging or other related to this filed, You must know HTML.

CSS Tutorial

As a web designer, you probably spend more time working with text than any other element.

PHP tutorial

We have already added PHP tutorial and Database Tutorial.

Internet

The best ways to make money both online and offline as a student. Lots of original ideas on how to make money quickly and easily to boost your finances.

Video Tutorials

Not everyone learns by reading books! Often the best way is to watch someone else first.

Saturday, September 5, 2015

How to add Google maps in your Blogger blog

Showing your business location by adding your address details somewhere at the corner of your webpage is an old school method. When it comes to online business you have to let your customers and visitors know about your business location. So why not assist them to easily find out your location by adding interactive Google maps in your Blogger blog? Especially if your business is listed in Google places, you can embed your exact location with more details. Here in this post we will see how to easily add / embed Google maps in Blogger blog pages, posts and even in sidebar.
>> Go to this link https://maps.google.com/  then The place where you are, who want to show off your blog to the search. See Image: 
>> Now you can get your location. Click on the Settings button to see a little down, and all the "Share or embed map" Click.  See Image:

>> Then a page will appear, see the "Share link" and "Embed map" There are two options from its "Embed map" Click. After clicking a box to find, copy the code in the box. Copy the code of your requirements before you choose the right size. Then copy the code. See Image: 

 >> Then login to your Blogger blog and Dashboard → Layout → Add a Gadget → HTML / Javascript, click and rose above the code to copy and paste them into the house, put the Save Content on the day. Just choose the course you want to show someplace Map.
Watch the video below

<<<--- If the problem is to find the code, then copy and paste the code directly below the Layout → Add a Gadget → HTML / Javascript putting.--->>>


                --------- -------------------Enjoy----------------------------

Thursday, August 6, 2015

How to Add Adsense Ads In the two post Middle inside your blogger

Many people may understand the title. The first two are in the middle of your blog-spot blog post, I will show how advertising can be placed. If you follow the steps below.  


  • • First blog-spot blog dashboard Template> Edit HTML Go.
  • • Now the code below stands out. You can easily press "CTRL+ F"  to find the code. 
  • • When you find the code at the top of the deficiencies, enter the following code after the code.
  •  • Now turn your ad code conversion. The above mentioned code. See Your Advertisement Code Here is the text of the code. Instead of just writing the code that you'd like to advertise, and save templates.

Hopefully the above post that is not a problem, and yes of course the size of the ad to fit the time would not be alive to see if it would not be good. If you post your work to share with the friends. If you have any problems, please comment below. Will be the best fit. Click here to view video...


Tuesday, July 28, 2015

AVG Internet Security 2015 Latest Serial Keys are Here

AVG Internet Security is a full package that turns your PC protects beside threats from the Internet. An anti-spam mark checks external e-mail and filters out surplus marketing messages, even before this land in your inbox. Are you often in social networks on the go, the program checked in real time, for example, sent URLs to their origin? The Smart Scanning runs almost silently in the background while you continue working on your PC.


Top skin
  1. File server protection
  2. Protection of workstations (laptops, personal computers)
  3. Anti-Spam workstations (laptops, personal computers)
  4. Protect your mail server
  5. The necessary level of protection
  6. Our specialists are always looking for new challenges, so we can quickly develop new ways of protection.
  7. AVG products protect more than 80 million PC users around the world.
  8. Easy to use security

How to make active?
  • Downloads the AVG Internet Security 2015 
  • During installation, it will ask you about key
  • Change the License Number in avg antivirus 
  • That’s it Enjoy!
Screenshots

  • Scroll down and any one copy the Serial Keys
Screenshots

  • Past the Serial Keys in  "New License Number"  box. and click "Active". 
Screenshots


Updated KEYS
8MEH-R78BH-EYG8L-MLMVA-Z2RWY-GEMBR-ACED
8MEH-R9Q3V-ZHN2T-92KCR-AYPHR-YEMBR-ACED
8MEH-RYH2W-SAT6N-H2HGA-WPAXZ-9EMBR-ACED
8MEH-RFOD4-SXWR8-JRTQA-J66DN-WEMBR-ACED
8MEH-RYGA4-P8CR8-WQV7A-7ZMJ4-8EMBR-ACED
8MEH-RYH2W-SAT6N-H2HGA-W2AS2-9EMBR-ACED
8MEH-RFOD4-SXWR8-JRTQA-J66DN-WEMBR-ACED
8MEH-RYGA4-P8CR8-WQV7A-7ZMJ4-8EMBR-ACED
8MEH-REJA9-D2M3S-337LR-DAXEM-REMBR-ACED
8MEH-RBG6H-9C2PW-G499A-LPHAP-8EMBR-ACED
8MEH-RRX6F-OD26X-H9ZCR-XQDX9-PEMBR-ACED
8MEH-RCKOP-BP9KK-YW8EA-6OKSL-SEMBR-ACED
8MEH-R78BH-EYG8L-MLMVA-Z2RWY-GEMBR-ACED
8MEH-R9Q3V-ZHN2T-92KCR-AYPHR-YEMBR-ACED
8MEH-RYH2W-SAT6N-H2HGA-WPAXZ-9EMBR-ACED
8MEH-RG9B7-BG7WC-PXRCR-JF3UP-HEMBR-ACED
Serial Keys
8MEH-RJR4R-7FDJ6-NL3DA-CRXQC-J­EMBR-ACED
8MEH-RXYFD-JDY72-8922R-FGLP8-Q­EMBR-ACED
8MEH-RYH2W-SRS6N-H2HGA-WCDTZ-9­EMBR-ACED
8MEH-RQEZT-B9MG3-E64FA-99LLH-6­EMBR-ACED
8MEH-RTN2Z-UUKMK-6RWGA-AAM82-V­EMBR-ACED
8MEH-RB32G-U868U-TRLQR-B68SM-C­EMBR-ACED
8MEH-RRX6F-OU36X-H9ZCR-XARDZ-P­EMBR-ACED
8MEH-RAJC2-OLO77-KRRQA-HLSNJ-R­EMBR-ACED
8MEH-RWEYH-SXKCN-6H9FR-39X22-6­EMBR-ACED
8MEH-RJR4R-7FDJ6-NL3DA-CGK2C-J­EMBR-ACED
8MEH-RQX93-WH4KW-BE2FR-QDQ4B-P­EMBR-ACED
8MEH-RNXBD-G4VHF-BSLSR-Z9C6C-P­EMBR-ACED
8MEH-R2CML-SS7FW-MOXFR-TVC9T-3­EMBR-ACED
8MEH-RFR8J-PTS8Q-92ATA-O4WHO-J­EMBR-ACED
8MEH-RPDWL-THRLY-O8Z3R-4H3OA-4­EMBR-ACED
8MEH-RCB97-4HRT9-P4RRR-RRFOP-2­EMBR-ACED

Thursday, May 28, 2015

About This Robots.txt

SEO (Search Engine Optimization) is the core of blog traffic. Now days Google are updating their system to give better results to their users. So its going hard to hardest to do Search Engine optimization for blog. But some tricks is still working. Custom robots.txt is one of them. You can simply modify your blog’s robots.txt to make your blog more SEO friendly.

Few days’ back I was faced some hassle about custom robots.txt for blogger blog. So I decided to get the best idea from experts. Then I posted few posts on few forums about the topic. The best answer what I get from googleproductforum is; one of Google’s engineer reply me to use this robots.txt for blogger blog. He also told me that he is also using this custom robots.txt in his own blog.

So I decided to use the mentioned custom robots.txt in my blogger blog. And after few days next I notice that  its really giving me the SEO juice. Today in this post I’m gonna share that SEO friendly custom robots.txt for your blogger blog that was recommended by Google.

How To Install All in One SEO Plugin Blogger:
Step 1: Login to your blogger account select Settings from blogger main menu next select Search preferencesfrom sub-settings.

Step 2: After selecting Search preferences click on Custom robots.txt Edit option under Crawlers and indexing.
Crawlers-and-indexing-blogger

Step 3: After clicking on Edit, blogger will give you two options Yes & No. Select Yes. After selecting Yes a new text box will open. Copy and paste the below text in that open box and hit Save changes button.
User-agent: Mediapartners-Google
Disallow: 

User-agent: *
Disallow: /search
Allow: /

Sitemap: http://tutorialsprogram.blogspot.com/feeds/posts/default?orderby=UPDATED


Customization:

Little customization step below to fit the robots.txt on your own blog.

Original: Sitemap: http://tutorialsprogram.blogspot.com/feeds/posts/default?orderby=UPDATED
Customization: Replace the red color marked "http://tutorialsprogram.blogspot.com" with your own blog URL.

Note: Use with caution. Incorrect use of these features can result in your blog being ignored by search engines.

Tuesday, February 3, 2015

how to add Disqus comment box set in blogger blog

The infrastructure of Blogger commenting system is quite neat and sufficient for many, but what would happen if it is must for your comments to connect to your website though some social sites like Facebook, Twitter, Google in order to make a comment. For that, a webmaster have to install too many Plugins or what should I Say extra effort and hard work.


Disqus is a yet another commenting system which is flexible enough to support API integration including Facebook, Twitter, Google, Open URL, and users can even login through their personal Disqus account (where all our conversation is being recorded). Another thing which makes it better, than any other commenting system is its, robust functionalities.

There is an easy way of integrating Disqus in Blogger. We have to just register a new account over Disqus and by Widget integration it will override all the old/previous comments. Thus, Disqus would be installed successfully.


Registering a New Account over Disqus: Perhaps the easiest part of the whole tutorial is to register your new account. Just head to Disqus.com and register a free account for your website. Select “Get this on your Site” and it will open a new registration form just fill it and head to the next step.  (Do not forget to verify your identity though email verification).

After pressing the Continue button, a new window will appear, which will ask you to select a Platform. Just Select "Blogger" from the list and proceed to the next step.

Installing Disqus Widget (Plugin) in Blogger: After selecting "Blogger" as your platform, a new page will be open'd. From here, the tutorial will get a little complex. This installation consists of two steps one to add Widget in Blogger and second to import old comments.

Step#1 Adding Widget: Now on the page there will be two options. Just Select Add "Your Site Name" to my blogger site and a new window will pop'd out which will allow us to install the widget in our blog respectively.

From the list select your blog and press the blue "Add Widget" button. It will successfully install Disqus commenting system in your site.

Step#2 Importing Comments: Now head back to the previous page where we were working previously  Since, we have fished working with the first step so, now head to the second one. In order to import your old comments from previous platform just go to Tools > Import and proceed to the next step.

On reaching Import menu there will be two options, but we have to select "Import comments from Blogger" so that it imports all those comments which are previously published on the site.

After selecting "Import Comments", it will take you to a new page where it will ask for accessing your blog's data. Just give it the permission by pressing "Grant Access" button.

After granting the permission go back to the Import >> Tools Page. Now you will be able to see a new option there i.e. "Choose a blog to import from" which will allow you to import comments from your blog. From the list select a blog to import comments. Once, the blog is selected press the "Import" button.

Congratulations, Disqus is successfully integrated into your Blogger enabled website. All the old comments will be processed one by one and would be available on your site once the Disqus team finishes reviewing it.

Some other delightful perks of using Disqus is that it allows us to generate a decent amount of revenue by showing some advertisements within comments. Some large organizations always prefer it because it not only helps a community to grow but also provides reliability and user satisfaction. All an all, it is a must have comment system.
Look at the video to know better:

Friday, January 30, 2015

How to hide or disable comments on all pages in Blogger blogspot

In Blogger you have easy option to enable or disable comments on all pages. If you don’t want anyone to comment on any of your pages including post pages then here you go.

In your Blogger dashboard go to settings >> posts and comments and you will have overall comment settings for Blogger.


Comment location you will have four options:

Embedded: This is the default option that appears in all your pages. This options sets comment box below the content.

Full page: In each posts this option will sets a link below which says “post a comment”. This link takes visitors to a separate page to make their comments.

Popup window:  In this option user will be making their comments on popup window.

Hide: This is the option that you needed. By enabling this users cannot make comments on any pages. But existing comments still show up.

Also you can set who can comment? And enable comment moderation as well.


Sunday, January 4, 2015

How to Add Facebook Comment Box in Blogger

Facebook comment for your blogger blog container give out since a good quality method to make your site more attractive and support reader to drop comments if they're before now logged in to Facebook. It in addition serve as a basis of traffic as using Facebook comment shares the comment and post page on the visitors viewers Facebook wall. Facebook comment has no SEO value since it’s being displayed in an iframe which Google won't index.


Comments complete with the standard comment box on your site has extra compensation specially if you get many of comment, more keywords you didn't really talk about in the post content but appear in comments make bring more search engine traffic. This is amazing Facebook comment lacks, not including the extra traffic you get from Facebook.

Adding Facebook Comment Box in Blogger Step 1 :

>>  Log in your Facebook account.
>>  Go to Setting option from to right corner.
>>  Click Developer option from below.
>>  Then click Docs button.
>>  Click Social Plugins option.
>>  Then click Comments from bellow right corner.
>>  You can see now 4 boxes like bellow picture.
  • Url to comment on box give your blog Domain Name.
  • Width box give width
  • Number of post 
  • Color Scheme box 


>>  Finally click Get Code button.

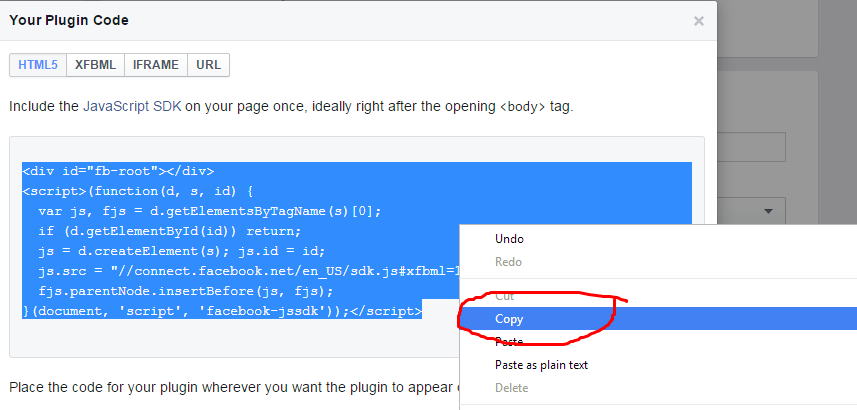
>>  Copy Html5 code from bellow picture.


Note: This is a small fact. After clicking save template, perhaps it say Error message like bellow picture. Now you should a small tricks. Go here And Html5 Coad Convert. Past facebook Html5 code in this box and click Convert. 
And Copy all converted code. 

Adding Facebook Comment Box in Blogger Step 2 :
  1. Log in Blogger dashboard.
  2. Go to template > edit html.
  3. Search </body> tag {Ctrl+f}
  4. Copy the code to the HTML Parse and Now past code above </body> tag.
  5. Click Save Template.
  6. Next search that blog and this red code  <b:include data='post' name='post'/>
  7. Past bellow codes after this red tag.
  8. Copy And past this code:
"
<b:if cond='data:blog.pageType == "item"'>
                 &lt;div
                     class=&quot;fb-comments&quot;
                     data-href=&quot;<data:post.url/>&quot;
                     data-width=&quot;590&quot;
                     data-num-posts=&quot;100&quot;&gt;
                 &lt;/div&gt;
            </b:if>
"


  9.  And Again Click Save Template.

Watch the video tutorials below : 


Thursday, January 1, 2015

Best internet browser

During the largest unexpected defeat in the browser hard work since Microsoft was forced to unyoke Internet Explorer from Windows, Google's Chrome fracture on the scene in 2008, original standard in browser speed, smooth design, and fast iterating software, all the other players to repair their possess lethargic software as they played catch up to the quick beginner. Chrome tired more than a few living as Programming Tutorials Editors Choice, but it's been surpass in speed and features, and it has depressed to a three-way secure for second place as previous favorite Firefox. By way of a wonderfully redesigned line, first-rate performance, careful memory use, helpful browsing tools, and important customization, the independent open-source browser has broken Choice for browsers.


Although Firefox is our favorite browser of the instant, there are motionless other excellent choice that, depending on your priority, will server your Web browsing needs very well, including Internet Explorer, Opera, and Maxthon.  All of the browsers now provide more-than-adequate support for the new HTML5 standard for website coding—even Internet Explorer has been acknowledged by Google as now being among the ranks of "modern" Web browsers. The search kingpin did this when it withdrew its Chrome Frame product, which inserted Chrome's page rendered inside IE.